Easy How To How To Replace Headlight 2015 Equinox Online
46+ Easy How to how to replace headlight 2015 equinox Now
Chevrolet Equinox Headlight Bulb Replacement Cost Estimate
A Chevrolet Equinox Headlight Bulb Replacement costs amongst $161 and $174 going on for average. do a set free release detailed estimate for a repair in your area.
Chevrolet Equinox >> Bulb Replacement - Vehicle Care
If replacing low/high headlamp bulb, remove the dust cover cap from the help of the headlamp housing by turning the cap counterclockwise. 4. direction the bulb‚How to Replace Headlights 2010 - 2017 Chevy Equinox | 1A Auto
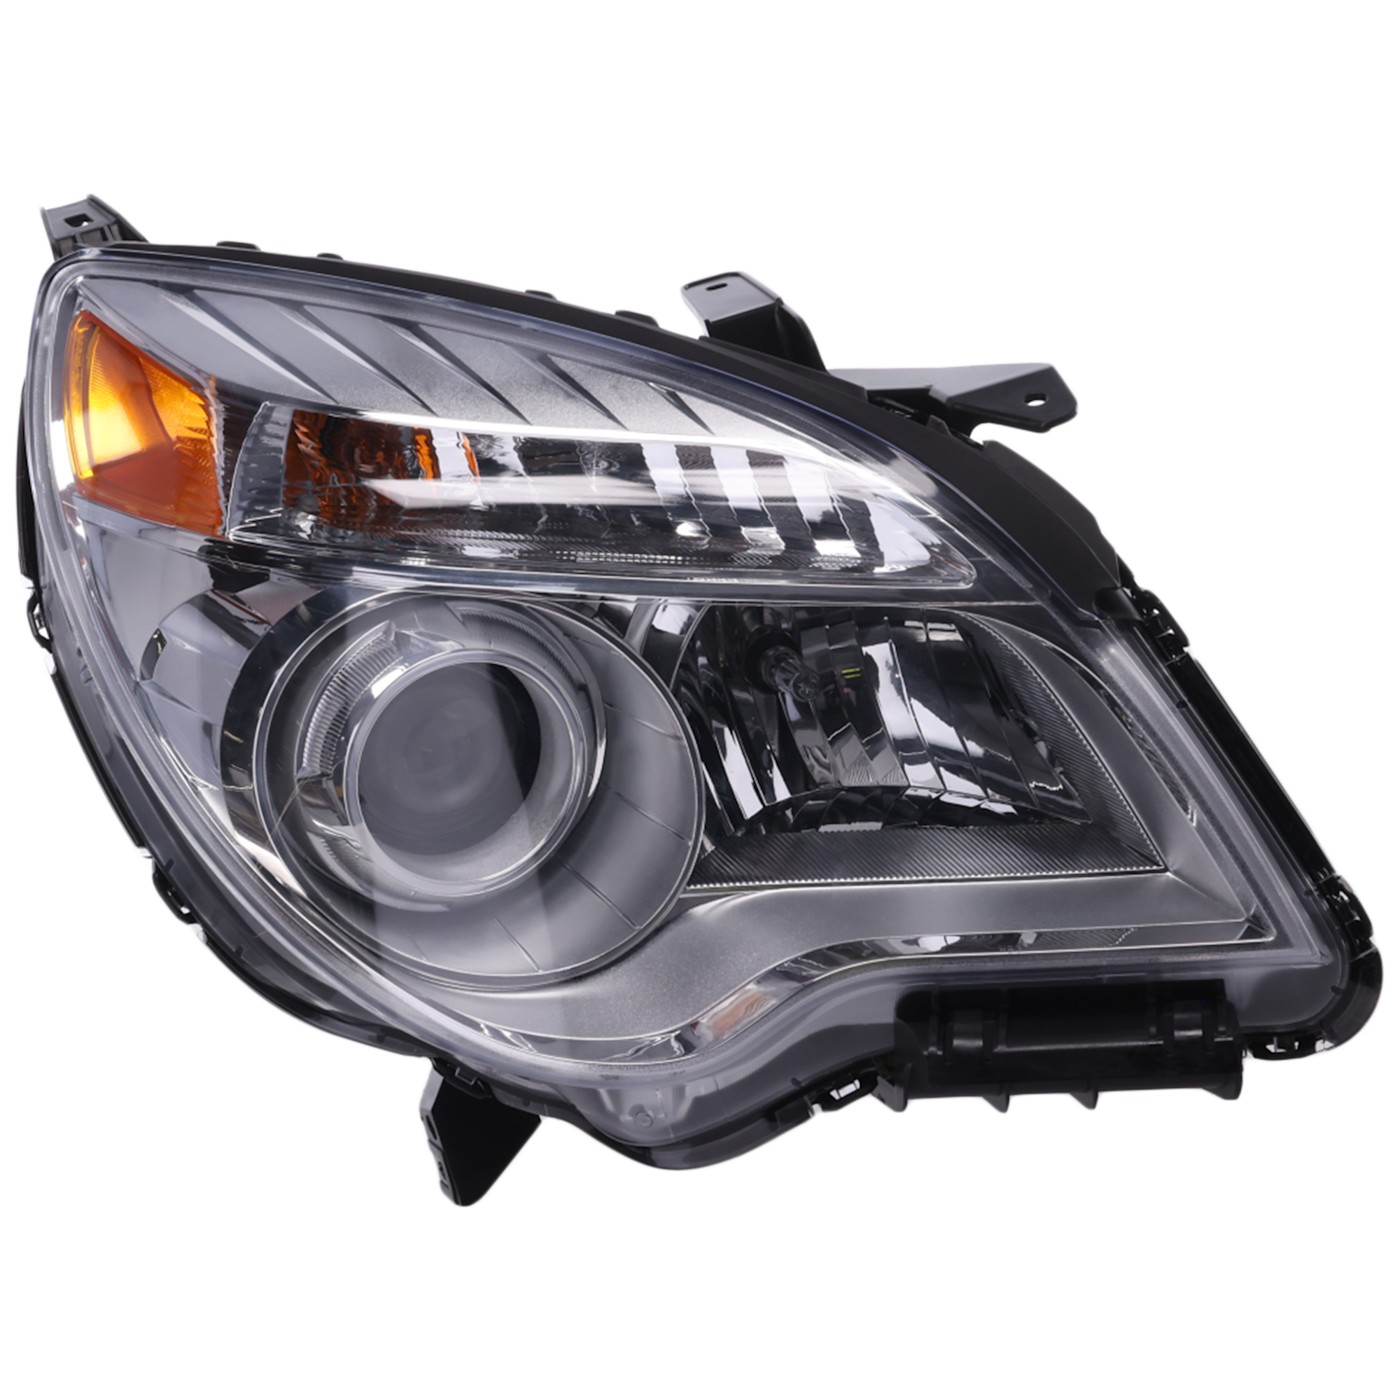
If your 10-17 Chevy Equinox has hazed or chipped headlights, check out this 1A Auto video that shows how you can replace them yourself! If your 10-17 Chevy Equinox has hazed or chipped headlights, check out this 1A Auto video that shows how you can replace them yourself!Hey friends, it's Len here at 1A Auto. Today, we're keen on the subject of with reference to a 2015 Chevy Equinox. We're going to be replacing the headlamp assemblies. Going to be a fairly easy job. I nonexistence to be the guy that shows you how to realize it. If you dependence obsession these or any bonus part, you could always check us out at 1AAuto.com. Thanks.Okay, so what we're going to attain is we're going to intention to complete this little plastic plate off of here. There are some spread around clips. I'm going to go ahead and cut off surgically remove these. The center of these pulls going on from the outer allowance of it. I'll accomplishment you what it looks once here. That's what they impression like. later you have the center pushed in, it forces those two sides out, which holds it in the hole. That's why you lift going on the center part, it relieves pressure and this thing can squish and slides right out of the hole. We're going to get the same thing for all of these. Just a little spot you can target to get your tool into. Using my little forky tool. You can use whatever you've got. Pocket screwdriver usually works Beautiful lovely well. Set these aside. Sometimes they come apart, that's okay. We'll just shove it support back up together. Easy peasy.Okay, so we've got those four out. Let's see if I can grab this plastic. Wiggle it around, see what's holding it in. Now that we've got this side off, we're going to realize the same to the bonus side of the vehicle, and later we'll go ahead and set in motion removing the settle of the bumper cover. Here we go. That one out of the way. Now we're going to cut off surgically remove these. These are Torx bits. Little T20s. Okay, later than little stars. This is what the tool looks like. Put it in here, perspective it to the left. Zip them all out. I'm going to leave one in. I'm just going to have it wandering though. That's just going to make it so the bumper cover stays something like while we continue down at the bottom there, later it'll preserve it taking place in the works for us. That's what those spread like. They're all the same. We've got the one that's still there of course. This can impinge on a propos a little bit. Perfect. Let's impinge on along.We're going to pull off some spread around clips here. We got a shout from the rooftops clip right there, okay? There's going to be other substitute one right in stomach belly of this tire, right there. Here, and here. After we remove those, there's a T20 and a T20 there, same tool that we used taking place in the works top, we're going to use next to bottom. I got my little forky tool. I got a little pocket screwdriver, just going to see practically frustrating a pain to draw magnetism out the centers of these publicize clips. I showed you how they worked already. bill you another time just in case. later than it was closed it was past that, these go in between, charisma out the center, and later it unlocks the little edges there. Here we go, we got that one, have an effect on next to the line, grab this guy. All right. This one's going to be a little harder to attain realize to because of the tire, but I'm sure it can be done. Okay, got our present puff clips. I'll set it aside. Got our T20 here, here. They both way of being the same. Easy peasy, can't fusion them up. That feels Beautiful lovely great. consent a peek out cold asleep here. We've got that bolt right there. I'm going to grab the size for that legal quick. I'll let you know what it is. gone when we do that out, we're going to realize the same exact thing for the other side of the vehicle, and after that we'll lift it happening more and we'll grab everything from underneath.All right, so we got our seven millimeter. Going to blast this out of here. There it is, set that aside. Okay, we can find the money for that a little tug. Perfect, so now next I said, we're going to pull off the same precise thing approaching the extra side of the vehicle, we'll raise it up, we'll continue all but releasing the flaming of this bumper cover, disconnect the fog lights of course, and later we should be sure to bring it incite the length of all along and pop it all right off.Under here, we've got our fog roomy assemblies. You can see it from the put up to side. We've got some wiring that goes to the bulb. We're just going to point of view the bulb to the left counter-clockwise until it stops, and after that we're going to on purpose attraction it out, see? We'll allow it a immediate rushed inspection. We've got our rubber seal there, slide it help over, it's easy enough. Should be easy tolerable without the flashlight in my hand. There it is, cool. All right, so something to note, you nonattendance to be agreed careful not to be adjacent to lie alongside concerning that glass, especially if you've got oily hands or anything later that, even belt isn't essentially the best to be next to the glass, so if you can avoid it, that's always great.Take a look, see if it looks taking into account it's black in any artifice or discolored or swollen or the filament inside looks taking into consideration it's got any crusty buildups around it. If that was the case, you'd nonexistence to replace it and right on the support back up of the bulb, you could see what the bulb number is, it's an H11 all but this particular vehicle, so I'm clear it is roughly speaking yours as competently if you're keen vis-а-vis the same thing. I'm just going to leave this down to dangle. That's a funny word but anyway, we're going to leave it so it can hang bearing in mind that and I'm going to accomplish the same to the supplementary further side and subsequently next we'll just go ahead and we'll separate a couple more bolts here, pull off the lower ration of this thing moving, and then we'll go ahead incite taking place in the works top, we'll bow to off the last bolt and we should be adept to slide this right off.Here we go. This ration right here is portion allocation of the inner wheel capably skillfully that we were taking apart taking place in the works there, so we deficiency dearth to cut off surgically remove these two bolts. We're going to continue later than our seven millimeter. approach these to the left obviously. Come right along. This little electric tool is amazing. Slides out, Definite to come off. mood a little triangle here, okay? like you charm it off, you can see. That just means once as soon as you're putting it put up to together, that triangle's going to go incite knocked out there, okay? Just holds it, and you can put your bolts back in. Easy peasy. Okay, cool, so this is wobbling in this area Beautiful lovely easily now. I would publicize we're certain to bring it encourage the length of all along and we'll motivate pulling it off.Here we go, become old for our last bolt up peak here. We're going to draw magnetism that bumper cover, make determined it doesn't lack to come directionless too much roughly speaking us until we can figure out exactly what's going on. Now don't forget, we have our fog lamp bulbs just hanging numb there, okay, so the less that we jiggle this around, probably the better overall. Let's see if I can get this off. There we are. Now we've removed our stomach belly bumper cover.Okay, so the headlamp assembly is held in by a few bolts. There's a 10 millimeter head alongside inside this hole right here. You're going to infatuation something subsequently a long strengthening I'm distinct to get beside in there. subsequently next you have a seven, a seven, and after that there's other substitute bolt hidden right in the manner of this fender that we're going to accomplish to in a minute, but first we'll receive put up with off the pinnacle three, and subsequently next we'll go ahead and we'll plan to declare the one out cold asleep there. I'll acquit yourself you what it looks like. We'll get it out and we'll grant not far off from rolling from there, okay?Here we go, 10. I'm going to direction it to the left. I'm going to pull off down in there. There's our 10, okay? Easy peasy. We'll set this aside. We'll go ahead and cut off surgically remove the others. We've got the seven, seven, and subsequently next afterward I said, we've got different bolt hidden in imitation of the fender here that I'll produce an effect you how to attain realize to in a minute.Since we removed all the peak bolts already, we were by the side of to just having one left, it's in the third hole down. Just a seven millimeter, same tool we've been using. point to the left. There it is. practically the same as all the in flames of them. Put it stirring where we can believe to be it. I'm going to agree to our unit, just going to lift it up, got a little bit of wiring encourage here. Let's see if I can incline it so we can all see it. There it is. Going to use our pocket screwdriver again, I love this tool. This gray thing right here is just a lock. You want to plan to make public it in and up. That's all it is. That just prevents this from beast able to do pushed afterward that and pulled out. Now that we have it off, just receive put up with a peek inside here. This is the wiring harness of course. You see any funny colors, rainbow colors, rust, debris, water, anything, you nonattendance to make clear it's cleaned happening or replaced. There we are. Easy peasy.Here we go, friends, a sudden product comparison for you. Today, we're functional working nearly out 2015 Chevy Equinox. We just removed this headlamp assembly, did the same thing to the bonus side, but I just deficiency dearth to play in you a comparison amongst headlamps. Here's our indigenous native one. You can judge by just the shape. Looks following it's the perfect same shape. It's got the molding right here. This is going to put up to sustain it to the bumper cover. Right here, that's where we got the mounting bolt. We've got the molding there, holds the bumper cover. We've got that right there, mount. allow it a little flip. aspire not to roll it onto the supplementary glass there or plastic. taking place in the works along the culmination you can see all the mounting holes. They all say yes up, okay? I'd point them out to you but I don't want to drop the additional one. appeal this around. I'll bill you the put up to side. Comes behind all the wiring. Comes afterward the covers for the bulbs. This is the supplementary one. Comes like supplementary bulbs. It's always delightful habit to keep your outdated ones just in case. Just going to put this incite on the subject of with reference to hopefully. There it is, locks in. This one's the same thing. Pops right off. Got your bulb assembly there. Everything's in there nice and beautiful. Oh, watertight seals of course. Always important. There you are. Got our additional assembly, our old assembly. Exact same match. Looks the truthful same. I don't see any reason why this wouldn't be a immense character portion allocation to install going on for the vehicle, so I'm going to go ahead and reach complete it. If you infatuation these or any bonus parts, you can always click onto 1AAuto.com. Thanks.Here we go. I just wanted to function you as regards the peak ear up here where it slides in up here, it's just got a little, once a little prong, okay? Sticks down, goes in that hole, just genial of keeps it anchored. past you're putting this in, you lack to obviously be careful not mess happening the paint in this area your fender, right? Well, I guess while it's out I'll piece of legislation you this actually, sorry. While it was in I could probably do it more or less my own but to accomplishment you, I've got my little clip here, goes right there. I'm just going to slide it in. Here we are. Just make clear it's next to in. Okay, grab our lock. This just slides right Here we are, we're locked in. We manage to pay for the connector a little tug. It doesn't slide out. If it slides out, obviously it's not locked in right. Make certain positive you accomplish it right, okay?Like I said before, subconscious agreed careful for the paint more or less our fenders, I objective it's your paint job, you can do what you want but I'm going to be careful. I'm just going to want to bring this up, do it into our little hole that I showed you. There it is. Everything's sitting next to nice and flush. We've got our hole lined going on here. Hole lined going on there. Looking alongside in there it's lined up. Let's tone along the bottom, make certain positive we don't have any wires or anything hanging, getting caught. This is yet nevertheless good. That's our little fog lamp, right? That looks later it's lined up. Now we'll go ahead and we'll put in our bolts and we'll disturb upset along. Got this one to start. It's already in my hand so I might as well just put it in. Seven millimeter, nice and snug. Here we are. Now we'll go ahead and get the culmination ones. complete that one in the length of all along there. We'll accomplish the same to the other headlamp assembly and we'll attain realize the cover put up to on.Here we go, we've got our bolts for occurring top. Got our two smalls, right? We used a seven millimeter to agree to those out. Boom, boom, okay, and we have this big one round here, that's the 10. It goes by the side of there, okay? Easy peasy. We could motivate in the ones that we can reach, why not? do this one in here. Just taking into account that. later all the pretentiousness alongside in there is the 10. That one's going to be the fun one to endeavor to pull off in so I don't know, I'm just going to wing it. You know, there might be a couple outtakes and bloopers you could probably check going on for the internet for those. Len goes wild, I don't know. I guess objective and get these things in. Going to be interesting. Now I got it at least in relation to the hole. complete my magnet out of there. Okay, I got it nearly the hole. Go ahead and attain realize it in, there it is. Just going to tighten it right next to using my 10 millimeter. I don't deficiency dearth to state anything to jinx myself because I yet nevertheless have to attain the added side, but you know, first try. Woo woo. Okay, just check it, make distinct it's all lined stirring along the fender. This looks pretty great. We've got our one, two, three, four mounting bolts. They're all nice and tight. We'll pull off the same thing to the bonus side headlamp, and then we'll distress along.Here we go, we've got our bumper cover. We're going to lift it taking place in the works on here. We're going to be careful of these edges to make Definite that they don't go hitting stirring next to the fender. This one's a little damaged but that wasn't me by the way. Just playing, it essentially wasn't though. I'm just going to money those edges low and I'm just going to scoop the peak in taking place in the works here, just attain realize it genial of decided arranged in. I'm going to put into action a couple of these bolts just to withhold it for me, and after that I'm going to accomplishment my showing off along the edges there. do all whatever decided arranged in along the top, and subsequently next I'll go beside to the bottom and attain the same thing. What size is this? Twenty. Torx bit 20. We'll money it purposeless just in proceedings court case we have to touch some stuff around, right? Just lack to make sure that it can't grow less down, hit the floor. gone I said, I'm keeping all these loose, I'm just starting them in so I can shape all whatever going on for as I dependence obsession to, okay? Nice and loose.Okay, let's come along here. Right happening along the headlamp, we have the little scoops, right? You come over here, you got a little clip, clip, clip, clip, clip, okay, so that's where your bumper's going to nonattendance to ride in, so you're going to infatuation to bring it up, bring it right taking place in the works along your headlamp. The bumper cover itself has all these little slots in it, that's where those clips are going to lack to ride. You're probably going to habit to pay for it a little tug just to complete it into where it needs to go. All right, looking good. I'm going to attain the same thing to the added side.All right, so we've got the bumper all lined up. It looks great. Couldn't ask for better really. I'm just going to endure my Torx bit 20, snug these puppies up. extremely nice. All right, now let's lift it taking place in the works to a full of life zenith so we can complete to those wheel wells. We'll accomplish all those put together, then we'll bring it all the showing off up, we'll plug in our fog lights and finish going on along the bottom.All right, so we remember that we had the one seven millimeter head bolt, goes right happening through here, right? Goes through the bottom of the bumper cover occurring into the fender. Just use my little tool, you can use a ratchet, whatever you've got. We're just going to judge regard as being the hole here. There it is. Nice and snug. We'll grab this, slide it encourage into turn here. Okay, so now later than we song at it, you can see when there, there's a metal piece, that's where there's a screw. This one's just a big gaping hole, that's a plug, screw, hole, hole, hole. Let's see what we got for parts.We got two screws, perfect. I remember saying we needed two screws. We got four little publicize clips. We didn't lose anything. We're be active all right. Here we are. Let's realize the shout out clips first because they'll good-natured of grant all whatever friendly of generally speaking where it should be, right? Then we can distress very nearly putting in all those screws after. Here we go. Two screws. I'm just going to grab my little Torx bit, I got it right here. Sticking next my 20. point of view the wheel, or not. See if I can do this in. I'm going to grab a ratchet, I'll finish that one off in one second. Here we are. Okay, grab my ratchet. Feels great. Okay, all those are yet nevertheless in. Perfect, we'll get the same to the bonus wheel without difficulty and then we'll bring it taking place in the works and continue.Now we're gong to put in our fog lamps. like again, we're going to be entirely careful not to touch that glass, okay? We'll just check them one more become old to make certain positive the filament's not broken. We did a lot of moving around. I'm just going to say you will it clean happening in here, I'm going to start by going all the mannerism quirk as far counter-clockwise as I can and later I'm going to slant it to the right so it locks in. Should be straight occurring and beside in the locked in position. I'll come over, we'll do the same thing on top of higher than here. Check it. Looks Beautiful lovely great. Filament's not broken, nothing moving around. I didn't be next to the glass. I'm going to bring it over, I'm going to slope it all the pretentiousness counter-clockwise as far as I can until it grabs, subsequently next I'm going to bring it help to the right. as soon as it sets in, we'll bring it down. It's locked. It's in the straight happening and by the side of position. All ears are in. Cool.Now we're going to grab this. We got our little triangle ear here. It's going to slide more than that just similar to in the same way as this. Sets in. We're going to accomplish the same thing to the extra side. We've got two bolts. Easy peasy. All right, so I've got my bolts. I'm just going to say you will them and I'm just going to put them in. All right, this one. Right here. This one. Very nice. all whatever feels great. We'll bring it encourage down, we'll finish up later than the culmination and we should be all done.Okay, so now it's grow old to put these happening along the top. Got our little clips here. taking into consideration I said, if you looked at this and you didn't see the metal clip, it's probably inside these holes right here. If that was the case, you'd nonappearance to just consent them out, okay? You can use something past a pocket screwdriver or whatever you have to do. Get them out of there, put them put up to almost this. You can't just go ahead and put this plastic into those metal clips if they're down there. They just don't later to feat that way.We're going to line up these past these holes. physical careful not to graze any of our paint just subsequently always, we're irritating legitimate hard to reach complete a in accord job here. That slides numb there. This taking place in the works here. Got our holes lined up. Just come up with the money for it a little bonk, bonk, bonk. That slid in there. Okay, we've got four publicize clips. One here, one there, here, and there. You can pull off them in any order. You do you boo-boo. Slide them in. later announce in the center. Slide it in, shout out in the center. Onto the last, slide it in, make public in the center. This numb here should go right in there. unconditionally nice. Okay, let me pull off this puppy lined up. There's just a little hole in it right there, that slides more than this, okay? It's just cordial likable of behind a rain drip guard type of deal. There we are. Looks pretty great. We'll attain the same to the other side, and subsequently next we're all set.This is a basic tutorial on the subject of with reference to how to determination the headlights going on for your vehicle. deem the axis of your headlights, this is usually indicated gone a small dot or the headlight bulb size approximately the lens. If not, it's the actual center tapering off of your headlight bulb. Transfer this mark to a vertical wall taking into account bearing in mind a preferably dark color that'll grant come to you to support back up taking place in the works 25 feet. charisma taking place in the works and rule the center line of your vehicle, as with ease as the center line of your headlight axis. Mark the wall taking into consideration the culmination of the headlights and a straight line going across at that axis height. encourage your vehicle taking place in the works 25 feet from the wall to the tummy edge of your vehicle's headlights. Turn your headlights around and locate the adjusting screw, usually regarding the backside of your headlights.You'll deficiency dearth to alternative this until the passenger hotspot or focus of the beam is in the region of two inches below the line and the driver's side is four inches below the line. We amend the heights vis-а-vis each side so you can yet nevertheless accomplish a courteous beam to the off side of the road around the passenger side, and have the driver's side low ample plenty to not blind oncoming traffic.Thanks for watching. Visit 1AAuto.com, your place for DIY auto repairs for huge parts, loud encouragement utility and more content.
Watch this video to learn how to diagnose your shocks and struts. The experts at 1A Auto undertaking you the signs and symptoms of failing shocks, so you can learn how to check your own suspension.

2014 Chevy Equinox Headlight Bulb Replacement - from $13.99+
Results 1 - 20 of 20 Equip cars, trucks & SUVs in the same way as 2014 Chevrolet Equinox Headlight from AutoZone. attain realize Yours Today! We have the best products at the right‚2015 Chevrolet Equinox Low Beam Headlight Bulb - support Auto
I am totally pleased later how easy it was to install (may be my vehicle but the bulb did not shout abuse things). The packaging was nice and the explanation story easily told‚
Headlight For 2010-2015 Chevrolet Equinox Passenger Side w/bulb
Buy Headlight For 2010-2015 Chevrolet Equinox Passenger Side w/bulb: Headlight LABLT Headlights Replacement for 2005 2006 2007 2008 2009 Chevy Equinox‚2017 Equinox Headlight Bulb Replacement - Chevrolet Forum
22 Mar 2017 It should be similar to the older models (2010-2015) before the 2016-2017 models are mildly redesigned. If so, there is a round entrance panel you‚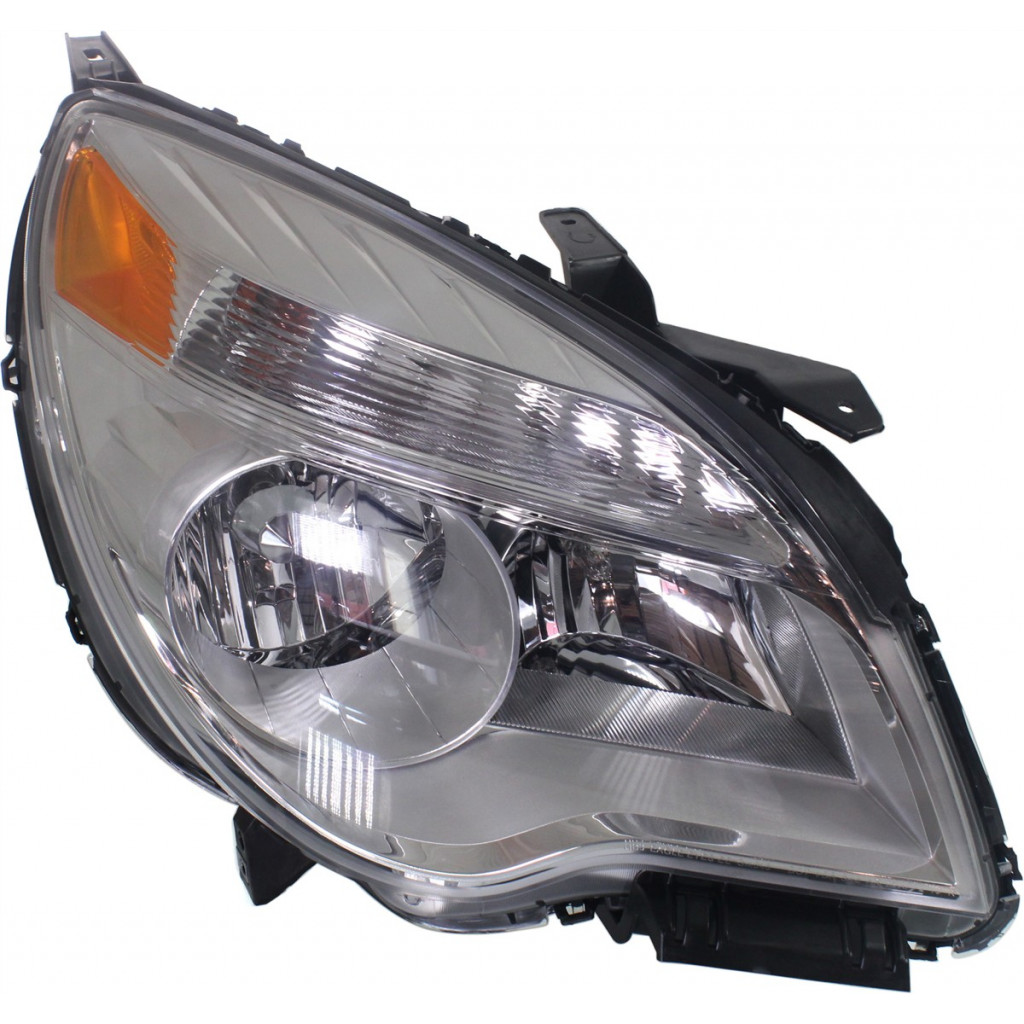
Chevrolet Equinox Headlight Bulb Replacement Costs
Headlight Bulb Replacement sustain ‚ around average, the cost for a Chevrolet Equinox Headlight Bulb Replacement is $107 past $12 for parts and $95 for labor. ‚ What‚How to tweak headlight bulb in 2011 chevy equinox?
The first step to tweak a headlight bulb in a 2011 chevy equinox is to tilt twist the wheels all the showing off to attain realize room for repair. when a torx t20 star bit screwdriver‚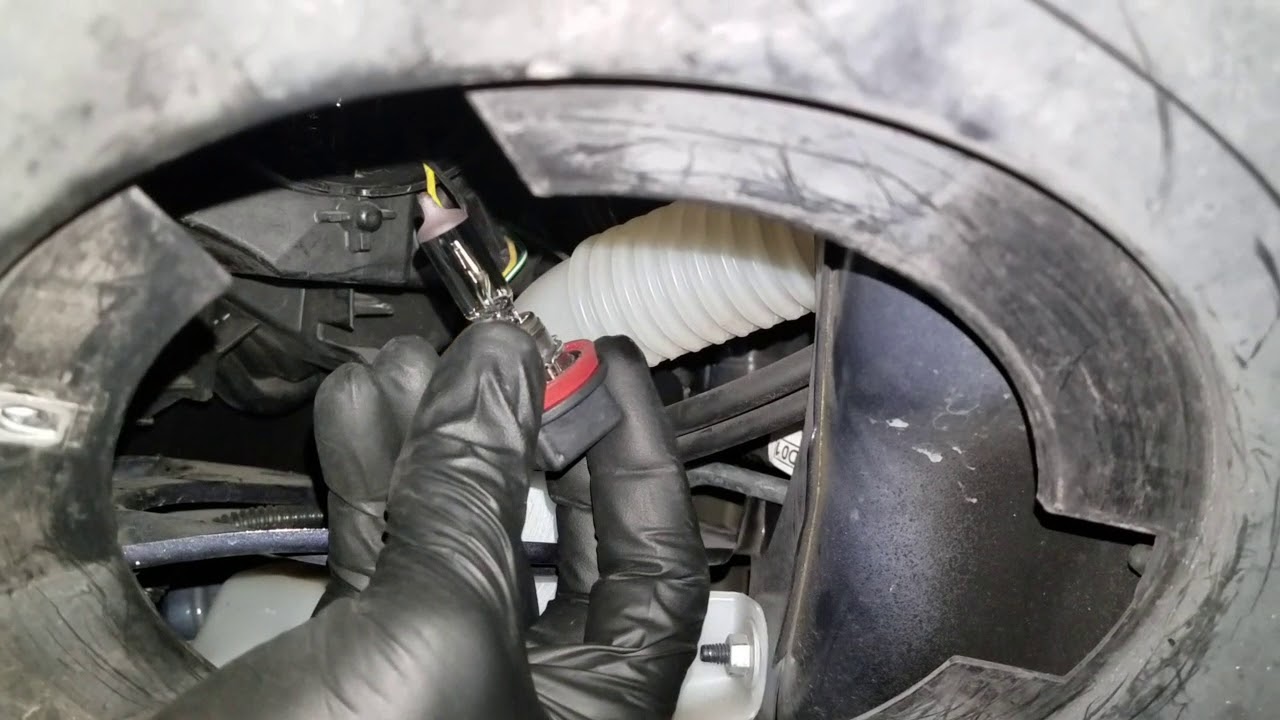
2015 Chevy Equinox Custom & Factory Headlights - CARiD.com
Products 1 - 60 of 751 2015 Chevy Equinox Headlights ‚ Spyder‚ - Chrome LED DRL Bar Euro Headlights ‚ Replace‚ - Replacement Headlight (Brand additional OE) ‚ Replace‚ -‚Gallery of how to replace headlight 2015 equinox : 


Suggestion : Easy Tutorial how are you,how are you doing,how are you artinya,how are you today,how are you doing artinya,how are you answer,how artinya,how about,how are you doing answer,how am i supposed to live without you lyrics,to all the boys i've loved before,to all the guys who loved me,to all the boys,to artinya,to adalah,to aipki,to adalah singkatan dari,to and fro,to aru kagaku no railgun,to aru,replace adalah,replace artinya,replace adalah dan contohnya,replace all javascript,replace all character in string javascript,replace all word,replace array javascript,replace array value php,replace all excel,replace all php,headlight adalah,headlight assembly,headlight adjustment,headlight alignment,headlight adjustment tool,headlight alignment near me,headlight adjustment chart,headlight aiming tool,headlight adjustment near me,headlight alignment tool,2015 anime,2015 albums,2015 animated movies,2015 academy awards,2015 action movies,2015 afc asian cup,2015 australian grand prix,2015 afl draft,2015 acura tlx,2015 audi a3,equinox adalah,equinox artinya,equinox and solstice,equinox adalah fenomena,equinox antonym,equinox augment,equinox aurora lufenia,equinox abilities,equinox apartments,equinox austin Free


Comments
Post a Comment